| Windows 95/98 |
| Settings/Control Panel/32bit ODBC |
| Windows NT |
| Settings/Control Panel/ODBC |
INFO~ODBC Lite v 2.10
Windows XP, 2K, NT, ME, 9x
E-mail:- info@doric.com
The CD or electronically transfer files will currently consist of 15 files, one of which is an install tool and called:-
INFO~ODBC Direct is a piece of middleware that allows users to connect INFO databases to ODBC enabled PC products. The INFO database files could have been created by PC INFO, ARC/INFO, INFO 32, or any revision of INFO. Where a UNIX machine has been joined to the PC network so that UNIX discs appear as another PC drive, then INFO~ODBC can connect to INFO files there as well. Samba (a freeware product) has been used successfully at Doric and other such networking products may work as well.
INFO~ODBC Direct sits on the client or PC whereas INFO~ODBC Server sits on the server (UNIX or NT) and does the bulk of the work there.
UK and International7 The Old Maltings, |
North America16816 35th Avenue NE |
Please read this page completely BEFORE installing the software. The install program is called setup.exe During the install phase you will be asked to confirm where the Security files should be loaded. If the default offered is unacceptable you may BROWSE and choose a new directory or if you enter one that does not exist, it will create a new directory of that name.
Execute the setup.exe file as supplied by any of the following methods:The install program will copy the files listed below to the Windows system directory depending on the file system you are running typically C:\WINDOWS\SYSTEM for Windows 95 or Windows 98 or C:\WINNT\SYSTEM32 for Windows NT.
| infood32.dll | infocf32.dll |
| simeng32.dll | simspy32.dll |
The following keys will be added to your registry:
[HKEY_LOCAL_MACHINE\SOFTWARE\ODBC\ODBCINST.INI\Doric INFO ODBC]Note: the directory may differ, for example on NT it could be C:\WINNT\SYSTEM32
The install procedure will also load the files listed below; there are 2 default directories and they may be changed. The first default directory is the path set by the environment variable _INFOSYS. Where this has not been set then C:\INFOSYS is the second default. In either case it can be over ridden with a directory of your choice.
| sys.dr9 | |||
| sys000.dat | sys001.dat | sys002.dat | sys003.dat |
| sys000.nit | sys001.nit | sys002.nit | sys003.nit |
These files form the security database system. It has been pre-set with a Data Source Name (DSN) of INFOAdmin and has been added to the list of ODBC data sources ready for use.
Please note - at the end of the install you will NOT find an INFO~ODBC executable, all the necessary software will be called via by the Microsoft ODBC Data Source Administrator.
INFO~ODBC creates a permanent link to an INFO or ARC/INFO database. With the help of Microsoft's ODBC Data Source Administrator a Data Source Name (DSN) is created & added to the list of ODBC databases, making it available to ODBC enabled PC products.
|
|
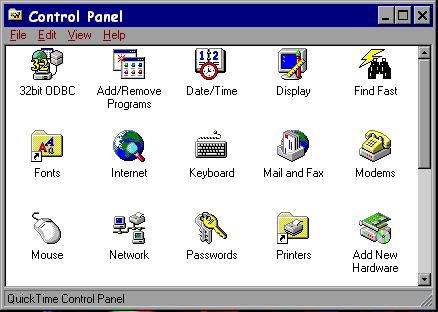
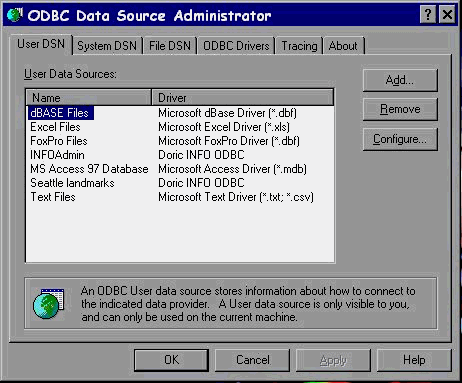
Microsoft's ODBC Data Source Administrator can be found from the Start
Button or Control Panel :
|
| This will show the available ODBC Data Source Names (DSN) and will include INFOAdmin - the DSN for the INFO database security system. | 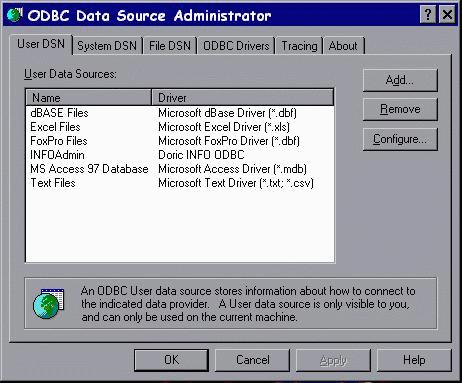 |
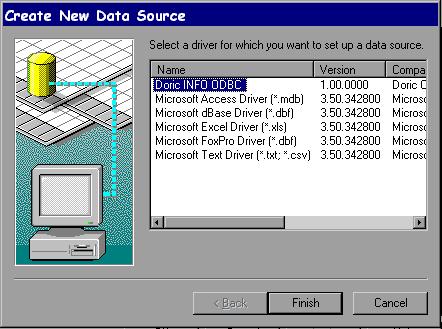
Add or configure a DSN for an existing INFO or ARC/INFO system :
A list of ODBC Drivers is shown.
|
 |
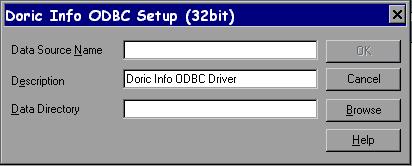
The Doric INFO ODBC Setup dialog is displayed
| ==> ==> |
 |
 |
The new data source will now be listed in the corresponding tab
(User DSN, System DSN or File DSN) in the ODBC Data Source
Admin program.
|
Many ODBC enabled products have differing rules on naming conventions or “special” characters, a Translation or conversion table is available to allow the user as much flexibility as possible. The user may wish to alter the supplied set. See notes on TRANSLATION file below.
PC users of INFO~ODBC fall into 2 main groups
The supplied security database is shipped with a BLANK record on the USER file, (this file contains the passwords) which when present takes precedence over all other passwords so that PASSWORDS are not requested. If a password is required this blank record must be removed.
For non-privileged users requiring secure access, it is assumed the System Administrator will set up the ODBC Data Sources on the desired machine(s) and then set up rights to control the access by each of these users. Each user has an associated password and belongs to a user group. Access rights to databases and tables are assigned to users and groups. The access rights for a particular group can apply to all databases, or certain databases, or certain tables within certain databases. The system administrator is responsible for setting the access level for each group and user.
User and password information is stored in an INFO database called sys.dr9. A DSN – INFOAdmin - has been set up for you to access and alter this information as you require.
There are 6 files: USER, GROUP, DATABASE, TABLE, TRANSLATION & VARIABLES. The formats and fuller technical information can be found at the end of this document. The minimum requirements are 2 records; 1 USER record and 1 GROUP record.
The USER file is shipped with 2 records, the second of which is blank - to use the security system PASSWORDS this record MUST be removed.
The TRANSLATION file is shipped with several records which may be amended, added to or removed.
Please check them and re-set for your own usage.
If security is not an issue and the user has full access the notes on security can be ignored but please check the detail on the TRANSLATION file.
For more information see the Security Database Technical Information notes at the end of this document.
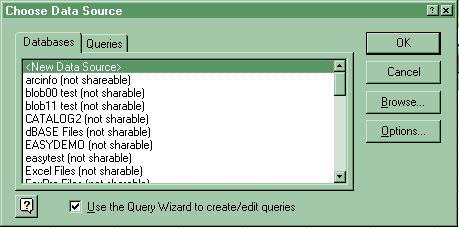
Once the DSN has been set up the INFO or ARC/INFO database is available to any ODBC enabled PC product. There are currently hundreds of products and more are being created all the time. It is not practical for us to test and give instructions on all of them. This software is merely a link - it creates a matching socket for ODBC enabled products to plug into. Access and Excel are perhaps the ones that most users are familiar with.
Please ensure that the version of Access you have is ODBC enabled and that all functions have been loaded. The "basic" MS Office or Access install does not necessarily load all the functions required. You may need to install ODBC and/or MS Query functions. The following dialogue is pre-set by Microsoft and will vary due to the product version used and the Windows operating system.
Examples created under Windows NT4 and Office 97/98
|
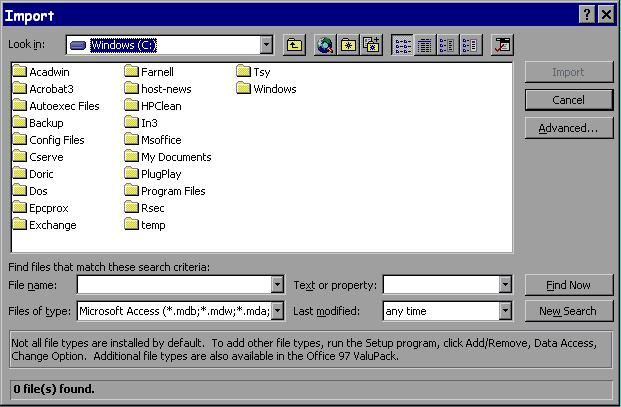
In either case set the type of file to be chosen in the Files of Type box
(bottom left of window) == > |
 |
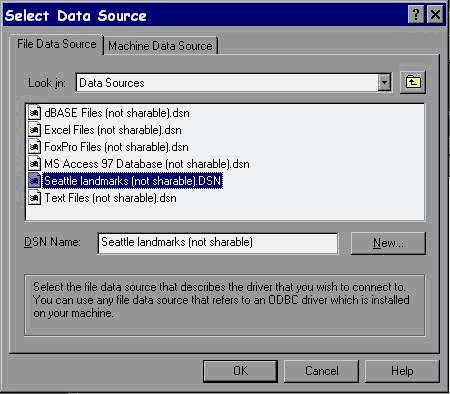 |
Highlight the required DSN.
Click OK |
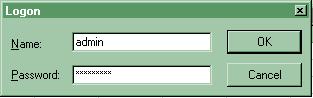
PASSWORDS are optional (see Security Database Technical Information)
Enter Name and Password - these are supplied pre-set to:-
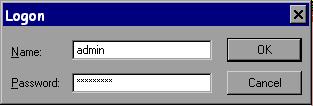 |
Name : admin
Password : adminpass |
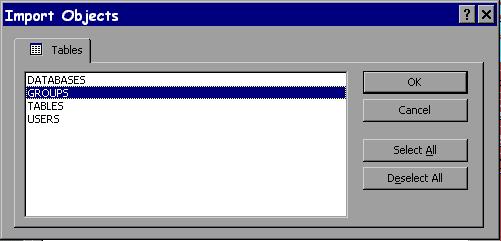 |
Note the Select all option. |
| Continue with Access as you wish |
 |
DO NOT USE the RECNO field this will be updated automatically.
Please ensure that the version of Excel you have is ODBC enabled and
that the Query functions have been fully loaded, the "basic"
install does not include this option. The following dialogue is
pre-set by Microsoft and will vary due to the product version used
and the Windows operating system.
Examples created using Windows 95 and Office 97.
| Highlight DSN of your choice
Click OK |
 |
PASSWORDS are optional (see Security Database Technical Information)
Enter Name and Password - these are supplied pre-set to:-
 |
Name : admin
Password : adminpass Passwords are case sensitive. |
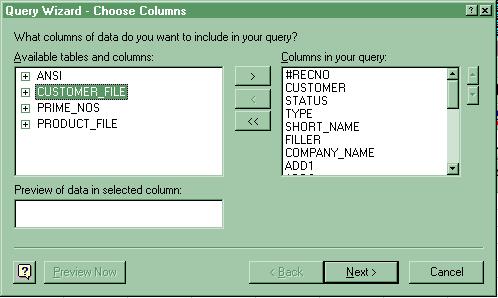
| Choose Files and items with Highlight and
> < << Buttons |
 |
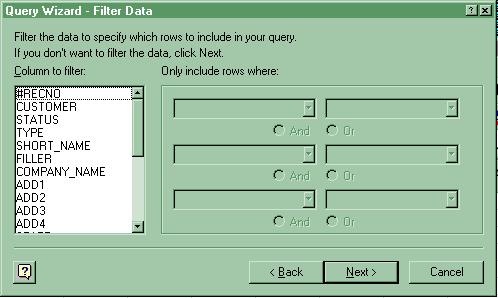 | Filter Data if necessary here |
| Sort data | 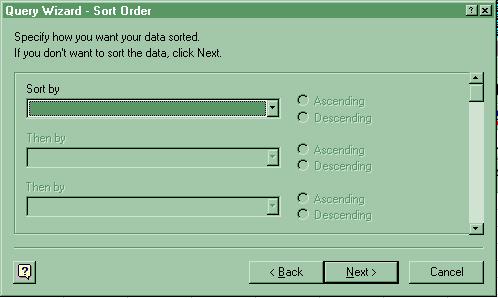 |
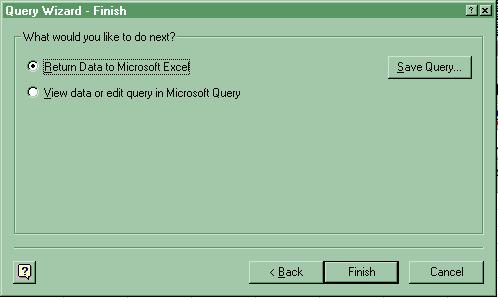 |
Click Finish to return data to EXCEL |
| Continue with Excel... | 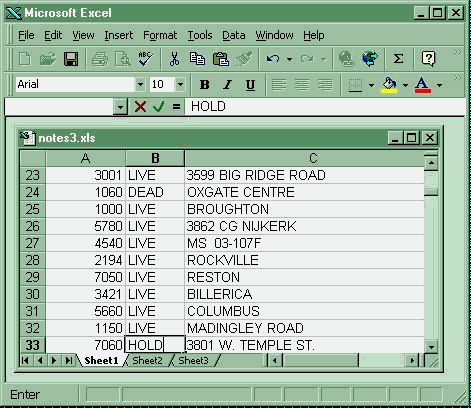 |
Version 1.0
Version 1.0 to Version 1.1
Version 1.1 to version v 2.09
The following are NOT available in INFO~ODBC Lite
INFO~ODBC enables you to access your INFO data via DAO, RDO and ADO, so you can choose the most appropriate database technology for your application.
The following simple examples demonstrate the process of connecting to and programmatically reading INFO using the various COM objects used for data access.
Create a new VB project. Use the menu project/references to add "Microsoft DAO 3.x Object Library" Draw a List control on Form1. Add the following code to Form1.
Private Sub Form_Load()


    Dim e As DAO.DBEngine


    Dim cn As DAO.Connection
    set e =

   CreateObject("dao.dbengine.36")


    e.DefaultType = dbUseODBC


    if 1 then


        ' using a DSN


        Set cn = e.OpenConnection(Name:="MyDSN")


    else


        'or not using a DSN
         Set

   cn= e.OpenConnection(Name:=

"",_<br>        Connect:="odbc;DRIVER={Doric INFO ODBC};DBQ= c:\MyPath\info\arc.dir")


    endif


    'issue SQL commands to be executed


    cn.Execute ("update table1 set MyField1 = 'abc' where MyField2 = 123")


    'perform query and retrieve result programmatically


    Dim rs As DAO.Recordset
    set rs =

   cn.OpenRecordset("select * from MyTable")


    'you can now access the INFO data


    While Not rs.EOF


        Dim f As Field


        Dim l As String


        l = ""


        For Each f In rs.Fields
            l = l & f & ", "


        Next f


        L = Left(l, Len(l)-2)


        List1.AddItem l


        rs.MoveNext


    Wend


End Sub
Create a new VB project. Use the menu project/components to add
“Microsoft Data Bound Grid Control”
Draw Data and >DBGrid controls on the new VB form.
Set the following property DBGrid1.DataSource = Data1.
Add the following code to Form1.
Private Sub Form_Load()


    If 1 then


        ‘using a DSN


        Data1.Connect = "ODBC;DSN=MyDSN"


    Else


        ‘not using a DSN


        Data1.Connect = "odbc;DRIVER={Doric INFO ODBC};DBQ= c:\MyPath\info\arc.dir"


    EndIf


    Data1.RecordSource = "MyTable"
    Data1.DefaultCursorType =

  ODBCCursor
    Data1.DefaultType =

  UseODBC


End Sub
Create a new VB project. Use the menu project/components to add
“Microsoft Data Bound Grid Control”
Create a new VB project. Use the menu project/references to add
“Microsoft RemoteData Object 2.0”.
Draw a List control on Form1. Add the following code to Form1.
Private Sub Form_Load()


    Dim cn As rdoConnection


    Dim en As rdoEnvironment


    Set en = rdoEnvironments(0)


    If 1 Then


        'using a DSN


        Set cn = en.OpenConnection(dsName:="MyDSN", Prompt:=rdDriverCompleteRequired)


    Else


        'or not using a DSN
         Set

   cn= en.OpenConnection(dsName:="",

Prompt:=rdDriverCompleteRequired,<BR>        Connect:="DRIVER={Doric INFO ODBC};DBQ=c:\MyDataPath\info\arc.dir", ReadOnly:=False)


    End If


    Dim qy As rdoQuery


    Set qy = cn.CreateQuery("qy1", "select * from MyField")


    qy.CursorType = rdOpenStatic


    Dim rs As rdoResultset
    Set rs =

   qy.OpenResultset(Type:=rdOpenStatic, LockType:=rdConcurValues)


    While Not rs.EOF


        Dim c As rdoColumn


        Dim l As String


        l = ""


        For Each c In rs.rdoColumns
            l = l & c & ", "


        Next c


        l = Left(l, Len(l) - 2)


        List1.AddItem l


        rs.MoveNext


    Wend


End Sub
Create a new VB project. Use the menu project/components to add
“Microsoft Data Bound Grid Control”
and “Microsoft RemoteData Control”.
Draw RemoteData and DBGrid controls on the new VB form.
Set the following property DBGrid1.DataSource = MSRDC1.
Add the following code to Form1.
Private Sub Form_Load()


    MSRDC1.CursorDriver = rdUseOdbc


    MSRDC1.LockType = rdConcurValues


    If 1 Then


          ‘for connection

with  DSN<BR>        MSRDC1.Connect="DSN=testdata;pwd=;uid=;"


    Else


        ‘for connection without DSN


        MSRDC1.Connect = "Driver={Doric INFO ODBC};DBQ=e:\testbed\data\tst.dr9"


    End If


    MSRDC1.SQL = "select * from table1"


    MSRDC1.Refresh


End Sub
Create a new VB project. Use the menu project/references to add
“Microsoft ActiveX Data Objects 2.x library”.
Draw a List control on Form1.
Add the following code to Form1.
Private Sub Form_Load()


    Dim cn As New ADODB.Connection


    Dim Qy As New ADODB.Command


    If 1 Then


          'using

a  DSN<BR>        cn.ConnectionString="uid=;pwd=;dsn=MyDSN"


    Else


          'or not using

a  DSN<BR>        cn.ConnectionString="uid=;pwd=;driver={Doric INFO ODBC};DBQ=c:\MyDataPath\info\arc.dir"


    End If


    cn.ConnectionTimeout = 10


    cn.Open


    Dim rs As New ADODB.Recordset


    rs.Open "select * from MyTable", cn


    While Not rs.EOF


        Dim l As String


        Dim f As ADODB.Field


        l = ""


        For Each f In rs.Fields
            l = l & f & ", "


        Next f


        l = Left(l, Len(l) - 2)


        List1.AddItem l


        rs.MoveNext


    Wend


    rs.Close


End Sub
Create a new VB project. Use the menu project/components to add
“Microsoft ADO Data Control” and
“Microsoft Hierarchical FlexGrid Control”.
Draw one ADO Data Control and one FlexGrid Control on
Form1.
Set the property MSHFlexGrid1.DataSource = ADODC1.
Add the following code to Form1.
  Private

Sub  Form_Load()<BR>    Adodc1.ConnectionString="dsn=MyDSN;uid=;pwd=;"


    Adodc1.RecordSource = "select * from MyTable"


    Adodc1.Refresh


End Sub
Currently it is not necessary to Uninstall INFO~ODBC prior to loading an updated version - however it may be necessary to do so in the future, especially if there was a long period between upgrades or a major enhancement has been added.
| Choose |
|
|
|
| Choose |
|
|
|
This section is for the System Administrator.
For non-privileged users requiring secure access, it is assumed the System Administrator will set up the ODBC Data Sources on the desired machine(s) and then set up rights to control the access by each of these users. Each user has an associated password and belongs to a user group. Access rights to databases and tables are assigned to users and groups. The access rights for a particular group can apply to all databases, or certain databases, or certain tables within certain databases. The system administrator is responsible for setting the access level for each group and user.
Depending on the ODBC product used it may be possible for the System Administrator to remove some INFO files and/or fields from the information presented to the user. Where this is not the case or additional security is required then the INFOAdmin security system may be used.
User and password information is stored in an INFO database called sys.dr9. This was loaded during the install into a directory of choice, C:/INFOSYS or that set by the environment variable _INFOSYS.
Administration can be performed on the SYS database as required with INFO products such INFO, PC INFO, INFO32 or an ODBC client, such as Access, using the pre-set DSN - INFOAdmin.
In the latter case, where the SYS database is exposed to ODBC enabled programs, then security will also apply to that database. For this purpose user groups can be identified as having 'admin' capability, in which case they will be allowed to open the SYS database, otherwise access is denied. In ACCESS a field called RECNO is displayed - do NOT enter data into it - it is generated.
There are 6 files: USER, GROUP, DATABASE, TABLE, TRANSLATION & VARIABLES.
The minimum requirements are 2 records; 1 USER record and 1 GROUP record.
The TRANSLATION file is shipped with several pre-set records – please amend or remove these as necessary..
The USER file is shipped with 2 records, the second of which is blank - to use the security system PASSWORDS this blank record MUST be removed.
Purpose: to associate user IDs with group IDs, (two pre-set record supplied).
|
|
|
|||||||||||||||||||||||||||||||||||||||||||||||||||||||||||||||
Purpose: specifies whether or not a particular group has global access rights that affect all databases and tables. And if so, specifies what those rights are.
For this purpose groupid provides a key into this table, to read the admin, apply_to_all and possible permit_xxxx fields.
|
|
|
|||||||||||||||||||||||||||||||||||||||||||
Limitations: Field lengths are set for dbpath (128), tablename (32), userid & groupid (15)
The permit_xxxx fields are only valid when apply_to_all='Y'. In which case the permit_xxxx fields specify the level of access that the particular group has on all databases and all tables.
When apply_to_all = 'N' the DATABASES table should be examined to find access levels on a per-database level.
Each permit_xxxx field is either 'Y' or 'N'.
e.g. if apply_to_all = 'Y' and permit_read = 'Y' and permit_update = 'Y' then all users in this group have read and update access to all databases and all tables.
The admin field indicates whether a user group has permission to modify the SYS security database.
Purpose: specifies whether or not a particular group has global access rights that affect all tables in a particular database. And if so, specifies what those rights are.
Here groupid / dbpath provides a key to retrieve the apply_to_all and possibly the permit_xxxx fields.
This table will only be used for groupid's that are listed in the GROUPS table with apply_to_all = 'N'.
|
|
||||||||||||||||||||||||||||||||||
The permit_xxxx fields are only valid when apply_to_all='Y'. In which case the permit_xxxx fields specify the level of access that the particular group has on all tables in the particular database.
The permit_ddl allows the user to create new tables in the database.
dbpath is a string specifying the full path and name of an INFO data directory
Purpose: to specify the level of access that a particular user group has on a particular database table. groupid / dbpath / tablename provide a key into the table to look up the permit_xxxx fields.
Note that this table will only be used for groupid / dbpath combinations that are listed in the DATABASES table with apply_to_all = 'N'
|
|
||||||||||||||||||||||||||||||||
| Field | Access rights | Value | SQL examples |
| permit_read | read data from file | Y / N | select * from tablename |
| permit_update | amend data in file | Y / N | update thing set field='data' where otherfield=xxxxx'; |
| permit_add | add data to file | Y / N | insert into tablename (field1, field2) values ('field1data', 'field2data'); |
| permit_delete | remove data from file | Y / N | delete from tablename where field = 'xxxxx'; |
| permit_DDL | create new files in existing database and delete files. | Y / N | create table newtable1 (newfield1 char(40), newfield2 Int) or drop table newtable1 |
Purpose: to allow the user control over the representation of “special characters” when used by SQL. These sets of translation values may be applied to a particular group. Where the groupid is blank the translation applies to all groups.
|
|
|
|||||||||||||||||||||||
groupid = the groupid this is to apply to or blank for all groups.
original = original string or character
replacement = replacement
flags =
indicates type of replacement
To change KEY into KEY_ for column or field items only and where KEY is the complete column or field name and for all groups
| Groupid | original | replacement | flags |
| space | KEY | KEY_ | 101 |
SPECIAL note – This solves the problem where SQL may automatically change a # (pound sign or hash) to _ (underscore) – the following allows # to be retained.
To make sure any column (field) ending in #, such as CENSUS#, retains it - include the following
| Groupid | original | replacement | flags |
| space | # | # | 103 |
Purpose: specifies the value by groupid of environmental variables.
|
|
|||||||||||||||
varname = variable name
varvalue = value of replacement
If environment variable have been used in “externalled” INFO files –flat (XX) or ISAM (CI) this will allow different groups to have different values in those environment variables.